
One might think discovering a bunch of tree limbs on your car would be rather disconcerting; fortunately not the case here.
The Daily Post weekly photo challenge: Reflecting
Cee’s Black and White Photo Challenge: letters S or T (T for trees)
One might think discovering a bunch of tree limbs on your car would be rather disconcerting; fortunately not the case here.
The Daily Post weekly photo challenge: Reflecting
Cee’s Black and White Photo Challenge: letters S or T (T for trees)

In yesterday’s post, the definition of bevels included the mention of “geometric configurations (called ‘clusters’) for incorporation into leaded glass work.”
Ah, clusters…
The fun thing about clusters is that you have ready-made pieces that you simply fit together (with copper foil or some type of came, i.e. lead), and then fill in the rest of your pattern with pieces to accomplish the desired panel shape (rectangle, square, circle…).
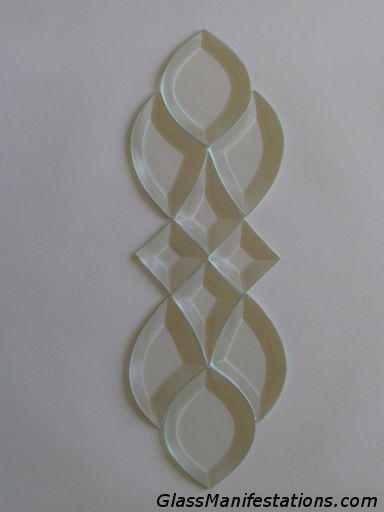
For example, I purchased a bevel cluster with ten bevels that – when pieced together – would look like this ornate design:
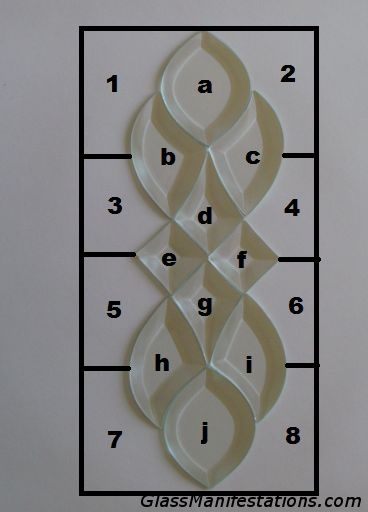
By cutting glass in the shapes of “1” through “8,” as pictured below, one could turn the design into a rectangular panel with the bevel cluster pieces (“a” through “j” in the diagram) centered within the rectangle. A simple example:
Something I like to do for fun is use the bevel pieces in a more unconventional way and incorporate them into panels to create entirely different patterns. In the example below I kind of “exploded” the bevel cluster and came up with this design:

And here is the completed panel:

I need to work on my window photography.
I titled the panel “Ascending.”
The bevels used in the “Manifest” design that appears on the header of this blog is another example of using a cluster in an unconventional way. Can you guess what the design was originally intended to be?
 C is for Cluster.

One way to easily dress up a stained glass panel is to incorporate bevels into the design. While frequently used as borders, individual bevels can also be employed as standalone elements in the overall design of a window or panel.
A bevel, as defined at Glass Patterns Quarterly, is:
“cold glass (usually clear, thick plate) with edges that have been ground and polished to an angle other than 90 degrees. Transmitted light is refracted and a prism-like effect results. Bevels are available in a variety of sizes, shapes and geometric configurations (called ‘clusters’) for incorporation into leaded glass work.”
There was a time when I was downsizing from my three-bedroom home (with garage studio), and moving into a one-bedroom apartment (no garage). I couldn’t see any way that I could find room for a stained glass work area. So I started selling/giving away/using up many of my supplies.
I had a box of triangle-shaped clear bevels that I had purchased with no particular project in mind. I probably got them in some kind of deal, like the “spend just $100 more and get free shipping on your order” offers. Who can pass those up, right?
I decided to make a window based simply around triangle bevels. This is what I came up with:

I’m back in a three-bedroom home (two bedrooms and one studio, actually), and glass supplies seem to be slowly accumulating again. I now have a box of ¾ inch by 4 inch rectangular bevels that I bought for no particular purpose (going-out-of-business sale… Hello!). They will no doubt start trickling into future designs.
In the meantime, I can always hang them in my windows and, just like Pollyanna, use them as prisms to create rainbows.
“Just as if anybody’d care when they were living all the time in a rainbow!”
~ Pollyanna, by Eleanor H. Porter
 B is for Bevel.

This is Day One of the WordPress Blogging U’s course Photography 101. Okay, I’ve taken the class twice before, but what can I say? It’s fun!
Today’s assignment is to share an image showing, “What does ‘home’ mean to you?” And of course, my first thought for a meaningful photo was: My bathroom! Well, more specifically, the new backsplash I made for the sink.
I happen to have a bit of opaque stained glass laying around (okay, maybe a lot of it), which I rarely use these days as I am mostly working with translucent or transparent glass for panels meant to be displayed in windows. I decided to try making opaque glass tiles to add a “splash” of color to the bathroom. The photo above shows the results.
My home is nothing fancy, was built over 60 years ago, and for me it is a perfect place to try out new skills on whatever “improvements” I want to attempt. It’s my life-sized “arts and crafts” project, you might say. My personal playground for pretending to be a plumber or a carpenter, or sometimes a purple unicorn. Don’t judge.
So what’s in the works for my next home project? I don’t know yet. I’ll have to see what’s in my toy box. Uh, I mean my tool box.

Daily Post’s weekly photo challenge: Circle
The interplay of light and glass can be quite fun and fascinating, and lighting designers, photographers and stained glass artisans can all take advantage of the unique relationship between light and glass if we just “reflect” on it a bit.
This chandelier makes a good example. Just looking at it straight on, you already notice how the reflections and shadows cast a pleasing starburst pattern on the ceiling.

Looking up from beneath the chandelier, the lights are reflected off each pane of glass, as well as the shiny brass portions of the fixture.

Here’s even more fun: The chandelier with its lights reflecting off the glass panes, all being reflected off the clear glass table that sits beneath the chandelier.

And lastly, the same chandelier as reflected off a sheet of iridized stained glass that’s sitting on the clear glass table beneath the chandelier.

The takeaway here is that the more we reflect on glass, the sooner we will come to see the light. Or something like that.
In response to Cee’s Black & White Photo Challenge: Reflections & Shadows AND The Daily Post Weekly Photo Challenge: From Every Angle


Glass on glass
reflected in glass.
No stone-throwing
please.
Photo 101 Assignment 17: Glass

